Tuesday, 5 October 2010

Turning a PC into a Wireless Access Point pt II

So, I've got my design, setting up an Access Point should be easy - after all, I can remember when Linux was one of the few operating systems that supported wireless networking (back when you had to build your own hardware).

Actually it is not easy.  Firstly, finding the right documentation is a nightmare.

There's an awfully large quantity of out of date stuff leading to a lot of dead ends.

The steps (for Ubuntu server 10.04 on a box with 1 wireless card and 1 ethernet connection) should be:
  1. make sure your wireless card works
  2. install bridging (thanks ubuntulinuxhelp.com)


    sudo apt-get install bridge-utils
    enable the bridge by entering its details into the interfaces file - since there are two network interfaces in my computer and only one had been enabled up to this point, I simply moved the card's IP address details into the bridge section.


    sudo cp /etc/network/interfaces /etc/network/interfaces.ORIG
    sudo vi /etc/network/interfaces

    # The loopback network interface
    auto lo
    iface lo inet loopback

    # The primary network interface
    auto eth0

    #This is the Wireless section.
    auto wlan0
    iface wlan0 inet manual
    wireless-mode master
    wireless-essid MyNewSID

    #This is the Bridge section.
    auto br0
    iface br0 inet static
    address 192.168.1.251
    netmask 255.255.255.0
    network 192.168.1.0
    broadcast 192.168.1.255
    gateway 192.168.1.253
    bridge-ports eth0 wlan0

    I'd recommend checking that the computer still boots properly at this stage - I messed up the networking by inadvertently getting the address wrong on my first attempt.
  3. install hostapd


    sudo apt-get install hostapd
    changes to /etc/hostapd/hostapd.conf (thanks Denilson) - all other entries left as default.

    driver=nl80211
    ssid=MyNewSID
    country_code=GB (thanks cisco)
    hw_mode=g
    channel=3
    max_num_sta=3

    macaddr_acl=1
    accept_mac_file=/etc/hostapd/hostapd.accept
    wep_default_key=0
    wep_key0=00000000ED57ERR0C500000000


    Then add the MAC addresses for the Games Adaptor and the Dreambox to /etc/hostapd/hostapd.accept in the format xx:xx:xx:xx:xx:xx

    The final piece in the jigsaw is getting hostapd to run as a daemon automatically on startup - edit the config file /etc/default/hostapd and uncomment RUN_DAEMON="YES" (thanks BadOpCode)
  4. restart networking and hostapd (or just reboot):


    sudo /etc/init.d/network-interface restart
    sudo /etc/init.d/hostapd start
So why doesn't it work ?
All looks fine from my laptop:

sudo iwlist scan
lo        Interface doesn't support scanning.

eth0      Interface doesn't support scanning.

eth1      Scan completed :
          Cell 04 - Address: 00:1B:11:06:AB:52
                    ESSID:"MyNewSID"
                    Protocol:IEEE 802.11bg
                    Mode:Master
                    Frequency:2.422 GHz (Channel 3)
                    Encryption key:on
                    Bit Rates:1 Mb/s; 2 Mb/s; 5.5 Mb/s; 11 Mb/s; 6 Mb/s
                              9 Mb/s; 12 Mb/s; 18 Mb/s; 24 Mb/s; 36 Mb/s
                              48 Mb/s; 54 Mb/s
                    Quality=61/100  Signal level=-64 dBm
                    Extra: Last beacon: 188ms ago

And the details on the server look fine too:


sudo ifconfig
br0       Link encap:Ethernet  HWaddr 00:1b:11:06:ab:52
          inet addr:192.168.1.251  Bcast:192.168.1.255  Mask:255.255.255.0
          inet6 addr: fe80::21b:11ff:fe06:ab52/64 Scope:Link
          UP BROADCAST RUNNING MULTICAST  MTU:1500  Metric:1
          RX packets:6537 errors:0 dropped:0 overruns:0 frame:0
          TX packets:3635 errors:0 dropped:0 overruns:0 carrier:0
          collisions:0 txqueuelen:0
          RX bytes:4028355 (4.0 MB)  TX bytes:522361 (522.3 KB)

eth0      Link encap:Ethernet  HWaddr 00:50:8b:c6:ff:47
          inet6 addr: fe80::250:8bff:fec6:ff47/64 Scope:Link
          UP BROADCAST RUNNING MULTICAST  MTU:1500  Metric:1
          RX packets:6614 errors:0 dropped:0 overruns:0 frame:0
          TX packets:3635 errors:0 dropped:0 overruns:0 carrier:0
          collisions:0 txqueuelen:1000
          RX bytes:4137117 (4.1 MB)  TX bytes:522361 (522.3 KB)

lo        Link encap:Local Loopback
          inet addr:127.0.0.1  Mask:255.0.0.0
          inet6 addr: ::1/128 Scope:Host
          UP LOOPBACK RUNNING  MTU:16436  Metric:1
          RX packets:154 errors:0 dropped:0 overruns:0 frame:0
          TX packets:154 errors:0 dropped:0 overruns:0 carrier:0
          collisions:0 txqueuelen:0
          RX bytes:32425 (32.4 KB)  TX bytes:32425 (32.4 KB)

mon.wlan0 Link encap:UNSPEC  HWaddr 00-1B-11-06-AB-52-30-30-00-00-00-00-00-00-00-00
          UP BROADCAST RUNNING MULTICAST  MTU:1500  Metric:1
          RX packets:0 errors:0 dropped:0 overruns:0 frame:0
          TX packets:0 errors:0 dropped:0 overruns:0 carrier:0
          collisions:0 txqueuelen:1000
          RX bytes:0 (0.0 B)  TX bytes:0 (0.0 B)

wlan0     Link encap:Ethernet  HWaddr 00:1b:11:06:ab:52
          inet6 addr: fe80::21b:11ff:fe06:ab52/64 Scope:Link
          UP BROADCAST RUNNING MULTICAST  MTU:1500  Metric:1
          RX packets:0 errors:0 dropped:0 overruns:0 frame:0
          TX packets:498 errors:0 dropped:0 overruns:0 carrier:0
          collisions:0 txqueuelen:1000
          RX bytes:0 (0.0 B)  TX bytes:145552 (145.5 KB)


sudo iwconfig
lo        no wireless extensions.

eth0      no wireless extensions.

wlan0     IEEE 802.11bg  Mode:Master  Frequency:2.422 GHz  Tx-Power=12 dBm
          Retry  long limit:7   RTS thr=2347 B   Fragment thr=2346 B
          Power Management:off
        
br0       no wireless extensions.

mon.wlan0  IEEE 802.11bg  Mode:Monitor  Frequency:2.422 GHz  Tx-Power=12 dBm
          Retry  long limit:7   RTS thr=2347 B   Fragment thr=2346 B
          Power Management:off

I've tried removing all protection, but still nothing will connect.

Let's see what is going on:


sudo brctl show
bridge name bridge id          STP enabled   interfaces
br0         8000.001b1106ab52     no         eth0
                                             wlan0

...so the bridge definitely exists.

What can the bridge see?

sudo brctl showmacs br0
port no     mac addr          is local?     ageing timer
  1     00:0d:4b:30:6e:94     no            30.28
  1     00:16:67:00:4a:d4     no             9.71
  1     00:16:6f:b2:41:d4     no             0.04
  2     00:1b:11:06:ab:52     yes            0.00
  1     00:50:8b:c6:ff:47     yes            0.00
  1     98:8b:5d:9d:c4:f8     no            45.70

...the bridge is only seeing stuff on the wired side (port 1).

TBC...
Tuesday, 21 September 2010

Turning a PC into a Wireless Access Point pt I

Ever since I got my new BT Home Hub 2, my Dreambox has stopped communicating with the network.
The Zoom Game Adapter cannot handle the WPA2 encryption that the Home Hub uses as standard.
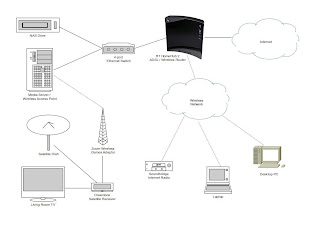
Whilst I could go the easy path of reducing the security level, my loft-based media server has a wireless network card, which raises the opportunity to give the Dreambox its own network, something that should be quite useful for streaming MPEG-2, or recording it to the NAS.
Time to break out OpenOffice Draw again and update the network plan:

Now for the tricky part... setting up a Linux Wireless AP using Ubuntu 10.04

I've identified a gap in the WiFi spectrum that I can use - the Home Hub sits on channel 11 and my neighbours are using Channels 1 & 6.  Checking the font of all knowledge, channel 3 appears the best choice as it will not argue with my network.


Firstly, I need to enable the card.  It's a D-Link DWL-G510 that I bought it a while ago when NDISWRAPPER didn't work - a bit of research showed that the chipset (RaLink RT2561/RT61) was supported natively.

The steps to check were gained from the Ubuntu Wireless Trouble-Shooting Guide:


sudo lshw -C network

returns:


  *-network:1 DISABLED
       description: Wireless interface
       product: RT2561/RT61 rev B 802.11g
       vendor: RaLink
       physical id: e
       bus info: pci@0000:00:0e.0
       logical name: wlan0
       version: 00
       serial: 00:1b:11:06:ab:52
       width: 32 bits
       clock: 33MHz
       capabilities: pm bus_master cap_list ethernet physical wireless
       configuration: broadcast=yes driver=rt61pci latency=66 multicast=yes wireless=IEEE 802.11bg
       resources: irq:11 memory:40200000-40207fff

...it's been seen.


sudo lsmod | grep rt61pci

returns:


rt61pci                18920  0
crc_itu_t               1371  1 rt61pci
rt2x00pci               6027  1 rt61pci
rt2x00lib              27541  2 rt61pci,rt2x00pci
eeprom_93cx6            1333  1 rt61pci

...the modules have been loaded.


sudo iwconfig

lo        no wireless extensions.

eth0      no wireless extensions.

wlan0     IEEE 802.11bg  ESSID:off/any
          Mode:Managed  Access Point: Not-Associated   Tx-Power=0 dBm
          Retry  long limit:7   RTS thr:off   Fragment thr:off
          Encryption key:off
          Power Management:off

Bring it up and see what's out there:


sudo ifconfig wlan0 up

sudo iwlist scan


lo        Interface doesn't support scanning.

eth0      Interface doesn't support scanning.

wlan0     Scan completed :
          Cell 01 - Address: 00:14:7F:A3:1D:67
                    Channel:1
                    Frequency:2.412 GHz (Channel 1)
                    Quality=40/70  Signal level=-70 dBm
                    Encryption key:on
                    ESSID:"BTHomeHub-0D7F"
                    Bit Rates:1 Mb/s; 2 Mb/s; 5.5 Mb/s; 11 Mb/s; 18 Mb/s
                              24 Mb/s; 36 Mb/s; 54 Mb/s
                    Bit Rates:6 Mb/s; 9 Mb/s; 12 Mb/s; 48 Mb/s
                    Mode:Master
                    Extra:tsf=0000003f7c0c3d63
                    Extra: Last beacon: 1124ms ago


It's alive!

We'll see about setting up the bridge tomorrow...


Building a home entertainment network:
  1. Designing a Network with Linux
  2. Installing Firefly Media Server
  3. Turning a PC into a Wireless Access Point pt I
  4. Turning a PC into a Wireless Access Point pt II
  5. Serving Video on Demand to a Dreambox

Friday, 10 September 2010

Installing Firefly Media Server

The first physical stage of building a home entertainment network is to install Firefly - it is shockingly easy on an Ubuntu Linux server...
  1. Connect to the server using ssh or PuTTY
  2. Use apt-get to install the service:

    sudo apt-get install mt-daapd
  3. Start the service:

    sudo /etc/init.d/mt-daapd start
  4. Make sure that the service starts when the server boots:

    sudo update-rc.d mt-daapd defaults
  5. Create a user to own your media files:

    sudo adduser media
  6. Move your local media files and transfer their ownership:


    for EXTN in mp3 m4a m4p ogg flac mpc
    do
    sudo mv *.$EXTN /home/media/music
    done
    sudo chown media:media /home/media/music/*
  7. Point a browser to port 3689 on the server and update the Configuration page so that the files in the media user's home directory are served.


    I found that setting the Scan Type to Normal and the interval to 120 (2 minutes) helped pick up the songs on the Samba share (more about them later)
  8. Tell Firefly to perform a full scan.

  9. Tell your radio to look for a server - on the Soundbridge, this just involves choosing "Library" from the menu.
  10. Make a nice cup of tea and enjoy the music.


    (coffee is also acceptable)
...or at least that should be it - but if you want to serve music from a cheap NAS drive, it may get a little harder.

Under /home/media/music I have created two directories - radio and share. All my locally held podcasts are in radio.

ls -l /home/media/music
total 8
drwxr-xr-x 2 media media 4096 2010-09-04 00:44 radio
drwxr-xr-x 2 media media 4096 2010-09-04 00:44 share

To make sure that the NAS is mounted automatically, edit the /etc/fstab file to include the drive (note that this is one line):
//192.168.1.252/dreambox/Music /home/media/music/share cifs nounix,iocharset=utf8,uid=media,gid=media,file_mode=0644,dir_mode=0755,guest 0 0
Here we hit a problem - upon performing a scan, the local files are the only ones discovered.

If we try to update the config via the Configuration web page, the message Error: 500 general:mp3_dir is displayed, and the change won't stick.

The Solution

In order to get Firefly to see the drive, it needs to be added manually to the configuration file whilst the server is not running.

I've noticed on several occasions that the service is still running after stopping it via the web page, so the easiest way of stopping the server is to kill its process:

  1. Find the process:


    ps -ef | grep daap
    mt-daapd 7230 1 0 14:06 pts/0 00:01:04 /usr/sbin/mt-daapd
    ed 12072 6292 0 20:07 pts/0 00:00:00 grep daap
  2. Kill it:


    sudo kill -9 7230
  3. Check that it is no longer running:


    ps -ef | grep daap
    ed 12075 6292 0 20:07 pts/0 00:00:00 grep daap

Now that the process has been stopped, edit the /etc/mt-daapd.conf file after making a backup:

sudo cp /etc/mt-daapd.conf /etc/mt-daapd.conf.old
sudo vi /etc/mt-daapd.conf

Useful vi commands:
KeyCommandExample
/Search/mp3_dir
AAppend at end of lineA,/sharedirectory
xDelete character
ddDelete lineUseful if you hit the arrow keys whilst appending
JJoin lines
EscFinish editing
:wqWrite file and quit
:q!Quit without writing file


The mp3_dir key holds a comma separated list of directories to search for audio files, so the offending share may be added as an extra directory:

mp3_dir = /home/media/music,/home/media/music/share

Write the file and quit (using the command :wq), then restart the service:

sudo /etc/init.d/mt-daapd start
Starting mt-daapd: mt-daapd.

Bingo! Where's that cup of tea ?

Building a home entertainment network:
  1. Designing a Network with Linux
  2. Installing Firefly Media Server
  3. Turning a PC into a Wireless Access Point pt I
  4. Turning a PC into a Wireless Access Point pt II
  5. Serving Video on Demand to a Dreambox

Thursday, 9 September 2010

Building a home entertainment network

...on a budget

Since I have a lot of networked devices floating around the house, I think that it would be good to integrate them:
  • LANDisk NAS storage
  • Roku Soundbridge Internet radio
  • Dreambox 500s (Linux) Satellite receiver
  • Old PC in loft
Conceptually, the old PC will act as a server, delivering music content to the Soundbridge and video to the Dreambox. The content will be stored both locally and on the NAS.

Some of the videos will require conversion to MPEG-2 as the Dreambox has a very small processor.

The Soundbridge is connected to the stereo, which is in a different part of the living room to the TV (and with wooden floors, cabling is not an option), so it would be a real bonus if the video content could have its sound delivered separately.

Design

How do you design a network on Linux ? A very short search (via SearchMarked.com ) put me onto OpenOffice.org's Draw application (already installed on Ubuntu), and Mark Lautman's helpful Open Office shapes repository. A bit more googling brought me the Cisco templates (this is where I got the clouds from).

In Draw, choose Extension Manager from the Tools menu to import the Cisco Templates.

Choose Gallery from the Tools menu to see the new objects - the interface is a bit clunky, so I found myself toggling the gallery so that it was only visible when I really needed it.

Resizing the Cisco clouds leads to quite unpredictable results, but perseverance pays off.

Mark Lautman's shapes are a bit easier to use - just open the document and use copy/paste to import the shape into your document.

A few minutes later and an export to JPEG... voila:

The PC in the loft is already running Ubuntu 10.04 and serving weather forecasts to the Soundbridge, so the first stage will be to set up a media server.


Building a home entertainment network:
  1. Designing a Network with Linux
  2. Installing Firefly Media Server
  3. Turning a PC into a Wireless Access Point pt I
  4. Turning a PC into a Wireless Access Point pt II
  5. Serving Video on Demand to a Dreambox

Friday, 31 July 2009

Instiki Lost Password

This is how I found the master password for my Instiki Wiki...

1. Googled "Instiki Lost Password" and found that passwords are in plain text in the /storage directory

2. Discovered that I don't have a /storage directory

3. Looked for anything with the word storage in the title

4. Discovered that the migrate_storage script had nothing to do with passwords

5. Looked for the database - \db\production.db.sqlite3

6. Opened it using SciTE as a last resort because I've got no idea how it's organised or should be read and I'd hit the point where I didn't care.

7. THERE IT WAS !!! In between an ESC and a NULL !!! Only half way down the page - no need to scan through reams of junk !

I really hope that this helps someone (and doesn't do any damage coz I'm an absolute novice with Instiki, Ruby and sqlite).

Ed

Wednesday, 15 July 2009

Synchronizing a Nokia 3110c with Evolution

Having my work calendar synchronized with my phone is an indispensable tool. Probably the biggest difficulty for me when moving from Windows to Linux was the loss of Nokia PCSync.

After a bit of research, I found this rather elderly article - then realized that I already had some of the earlier steps complete.

This should work for other Nokia phones - see note A below.

Here's my route:

1. for some reason, I cannot activate the built-in Bluetooth adaptor on my Acer TravelMate, so I plugged in a Belkin Bluetooth dongle which used to be connected to my work laptop. This was picked up automatically and the logo appeared on the top right.

2. On the phone, switch Bluetooth on and set the phone's visibility to "Shown to all"

3. Left click on the Bluetooth logo, and choose "Setup new device"


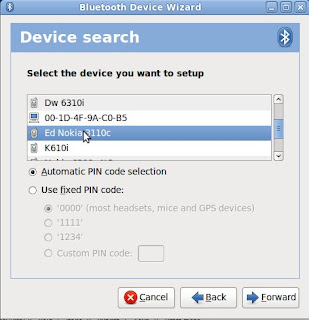
4. Highlight the phone that you want to connect to and click on the "Forward" button.

5. A pass key will be displayed - at the prompt, enter the pass key on the phone

6. In a terminal, run hcitool scan - this should return a list of the Bluetooth devices that can be seen by your computer. Take a note of the address for your phone - you'll need it later.

7. Set the phone's visibility to "Hidden" - you're a little bit more secure that way.

...this is the point where I start copying from a wonderfully helpful posting at ubuntu forums...

8. Install a few packages - you can use synaptec package manager to choose these individually, but you're probably better off running the following apt-get from the command line:

sudo apt-get install libmultisync-plugin-irmc libmultisync-plugin-irmc-bluetooth libopensync0 libpisync0 libsyncml0 multisync multisync0.90 multisync-tools opensync-plugin-evolution opensync-plugin-file opensync-plugin-google-calendar opensync-plugin-irmc opensync-plugin-syncml opensyncutils python-opensync rsync

Following otto67's example, I don't have a clue what some of these packages do, but it works.

9. Open "Applications - Accessories - Multisync-gui"
As the name suggests, this is a nice GUI to set up Multisync.

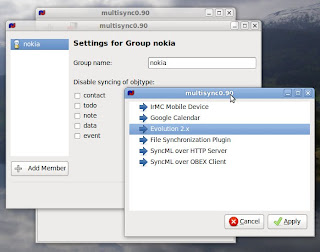
10. Click on "Add"

11. Enter a group name (in a flash of originality, I used nokia) and click Apply

12. Click on the "Edit" button, then "Add Member", highlight "Evolution 2.x" and click Apply

13. Do the same to add "SyncML over OBEX Client"


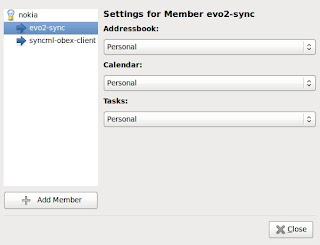
14. Highlight "evo2-sync" - check that Addressbook, Calendar and Tasks are marked "Personal"


15. Highlight "syncml-obex-client" (note that the window can be resized) - delete the existing content and paste the following text:

---------------
<config>
<bluetooth_address>xx:xx:xx:xx:xx:xx</bluetooth_address>
<bluetooth_channel>11</bluetooth_channel>
<interface>0</interface>
<identifier>PC Suite</identifier>
<version>1</version>
<wbxml>1</wbxml>
<username></username>
<password></password>
<type>2</type>
<usestringtable>1</usestringtable>
<onlyreplace>0</onlyreplace>
<recvLimit>10000</recvLimit>
<maxObjSize>0</maxObjSize>
<contact_db>Contacts</contact_db>
<calendar_db>Calendar</calendar_db>
<note_db></note_db>
</config>

- Replace xx:xx:xx:xx:xx:xx with the bluetooth address of your phone using the results of the hcitool scan in step 6. If you're not using a 3110c, you may need to change the Bluetooth channel (see Note A below).

16. Double-check the settings in steps 14 & 15, then click on the close button. You're nearly there!

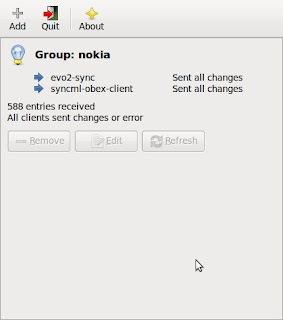
17. Now click "Refresh" to start synchronizing.

...this can take a while...

Notes...

A. If you have a different phone, use sdptool browse xx:xx:xx:xx:xx:xx and choose the Bluetooth channel that relates to SyncML - "SyncML Client", “Nokia SyncML Server” or similar.

B. otto67 had the following issue (I didn't, but he was synchronizing a Nokia E70):
First sync I had hangup but after discovered that "Notes" on the phone are causing this.
So I deleted all notes from my phone (I dont use them very much).

C. The final step was not completing (I left it for 2 hours originally) - I altered the config entry <note_db>Notes</note_db> as shown in step 15. If you want notes, restore the line in the config after the first sync.

Friday, 26 June 2009

MythTV Installation

Following my first attempt, I've decided to follow advice and install ubuntu, then add the MythTV package.

Ubuntu wasn't quite painless - during the first attempt, the screen went blank (I assume some kind of screensaver) and wouldn't respond. I wound up switching the box off, then reinstalling - this time, I moved the window displaying the progress bar every once in a while, and experienced no issues.

Myth Setup is still not displaying the buttons on tha bottom of the screen, despite my display being recognised and set to a more reasonable 1024x768 (Mythbuntu offered me 512x384 or 320x240).

It happily detected my Analog WinTV PVR-150, although if I'd read the instructions properly, I wouldn't have assumed that seeing the hardware name meant that it had set it up too. Thanks to some other idiot with the same problem, it was fixed in a jiffy.

The first real snag happens at the TV listings stage - I've got the choice of Schedules Direct (North America), EIT (the listings transmitted with a DTV signal) or No grabber. Mythbuntu offered me an alternative XML offering...

Running a scan gave me loads of channels, most of which are blank. I managed to resolve this issue by installing the mythbuntu control centre (choosing Add/Remove from the Ubuntu Applications menu), then in the control centre, add mythweb which gives a really easy way to delete unnecessary channels.

I still need those schedules though - looks like I'm going back to Mr. Parker for advice here - although he's got digital - I only want listings for 5 channels...

To be continued...