Tuesday, 21 September 2010

Turning a PC into a Wireless Access Point pt I

Ever since I got my new BT Home Hub 2, my Dreambox has stopped communicating with the network.
The Zoom Game Adapter cannot handle the WPA2 encryption that the Home Hub uses as standard.
Whilst I could go the easy path of reducing the security level, my loft-based media server has a wireless network card, which raises the opportunity to give the Dreambox its own network, something that should be quite useful for streaming MPEG-2, or recording it to the NAS.
Time to break out OpenOffice Draw again and update the network plan:
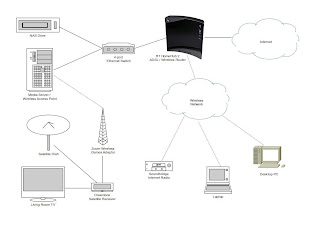
Now for the tricky part... setting up a Linux Wireless AP using Ubuntu 10.04

I've identified a gap in the WiFi spectrum that I can use - the Home Hub sits on channel 11 and my neighbours are using Channels 1 & 6.  Checking the font of all knowledge, channel 3 appears the best choice as it will not argue with my network.


Firstly, I need to enable the card.  It's a D-Link DWL-G510 that I bought it a while ago when NDISWRAPPER didn't work - a bit of research showed that the chipset (RaLink RT2561/RT61) was supported natively.

The steps to check were gained from the Ubuntu Wireless Trouble-Shooting Guide:


sudo lshw -C network

returns:


  *-network:1 DISABLED
       description: Wireless interface
       product: RT2561/RT61 rev B 802.11g
       vendor: RaLink
       physical id: e
       bus info: pci@0000:00:0e.0
       logical name: wlan0
       version: 00
       serial: 00:1b:11:06:ab:52
       width: 32 bits
       clock: 33MHz
       capabilities: pm bus_master cap_list ethernet physical wireless
       configuration: broadcast=yes driver=rt61pci latency=66 multicast=yes wireless=IEEE 802.11bg
       resources: irq:11 memory:40200000-40207fff

...it's been seen.


sudo lsmod | grep rt61pci

returns:


rt61pci                18920  0
crc_itu_t               1371  1 rt61pci
rt2x00pci               6027  1 rt61pci
rt2x00lib              27541  2 rt61pci,rt2x00pci
eeprom_93cx6            1333  1 rt61pci

...the modules have been loaded.


sudo iwconfig

lo        no wireless extensions.

eth0      no wireless extensions.

wlan0     IEEE 802.11bg  ESSID:off/any
          Mode:Managed  Access Point: Not-Associated   Tx-Power=0 dBm
          Retry  long limit:7   RTS thr:off   Fragment thr:off
          Encryption key:off
          Power Management:off

Bring it up and see what's out there:


sudo ifconfig wlan0 up

sudo iwlist scan


lo        Interface doesn't support scanning.

eth0      Interface doesn't support scanning.

wlan0     Scan completed :
          Cell 01 - Address: 00:14:7F:A3:1D:67
                    Channel:1
                    Frequency:2.412 GHz (Channel 1)
                    Quality=40/70  Signal level=-70 dBm
                    Encryption key:on
                    ESSID:"BTHomeHub-0D7F"
                    Bit Rates:1 Mb/s; 2 Mb/s; 5.5 Mb/s; 11 Mb/s; 18 Mb/s
                              24 Mb/s; 36 Mb/s; 54 Mb/s
                    Bit Rates:6 Mb/s; 9 Mb/s; 12 Mb/s; 48 Mb/s
                    Mode:Master
                    Extra:tsf=0000003f7c0c3d63
                    Extra: Last beacon: 1124ms ago


It's alive!

We'll see about setting up the bridge tomorrow...


Building a home entertainment network:
  1. Designing a Network with Linux
  2. Installing Firefly Media Server
  3. Turning a PC into a Wireless Access Point pt I
  4. Turning a PC into a Wireless Access Point pt II
  5. Serving Video on Demand to a Dreambox

Friday, 10 September 2010

Installing Firefly Media Server

The first physical stage of building a home entertainment network is to install Firefly - it is shockingly easy on an Ubuntu Linux server...
  1. Connect to the server using ssh or PuTTY
  2. Use apt-get to install the service:

    sudo apt-get install mt-daapd
  3. Start the service:

    sudo /etc/init.d/mt-daapd start
  4. Make sure that the service starts when the server boots:

    sudo update-rc.d mt-daapd defaults
  5. Create a user to own your media files:

    sudo adduser media
  6. Move your local media files and transfer their ownership:


    for EXTN in mp3 m4a m4p ogg flac mpc
    do
    sudo mv *.$EXTN /home/media/music
    done
    sudo chown media:media /home/media/music/*
  7. Point a browser to port 3689 on the server and update the Configuration page so that the files in the media user's home directory are served.


    I found that setting the Scan Type to Normal and the interval to 120 (2 minutes) helped pick up the songs on the Samba share (more about them later)
  8. Tell Firefly to perform a full scan.

  9. Tell your radio to look for a server - on the Soundbridge, this just involves choosing "Library" from the menu.
  10. Make a nice cup of tea and enjoy the music.


    (coffee is also acceptable)
...or at least that should be it - but if you want to serve music from a cheap NAS drive, it may get a little harder.

Under /home/media/music I have created two directories - radio and share. All my locally held podcasts are in radio.

ls -l /home/media/music
total 8
drwxr-xr-x 2 media media 4096 2010-09-04 00:44 radio
drwxr-xr-x 2 media media 4096 2010-09-04 00:44 share

To make sure that the NAS is mounted automatically, edit the /etc/fstab file to include the drive (note that this is one line):
//192.168.1.252/dreambox/Music /home/media/music/share cifs nounix,iocharset=utf8,uid=media,gid=media,file_mode=0644,dir_mode=0755,guest 0 0
Here we hit a problem - upon performing a scan, the local files are the only ones discovered.

If we try to update the config via the Configuration web page, the message Error: 500 general:mp3_dir is displayed, and the change won't stick.

The Solution

In order to get Firefly to see the drive, it needs to be added manually to the configuration file whilst the server is not running.

I've noticed on several occasions that the service is still running after stopping it via the web page, so the easiest way of stopping the server is to kill its process:

  1. Find the process:


    ps -ef | grep daap
    mt-daapd 7230 1 0 14:06 pts/0 00:01:04 /usr/sbin/mt-daapd
    ed 12072 6292 0 20:07 pts/0 00:00:00 grep daap
  2. Kill it:


    sudo kill -9 7230
  3. Check that it is no longer running:


    ps -ef | grep daap
    ed 12075 6292 0 20:07 pts/0 00:00:00 grep daap

Now that the process has been stopped, edit the /etc/mt-daapd.conf file after making a backup:

sudo cp /etc/mt-daapd.conf /etc/mt-daapd.conf.old
sudo vi /etc/mt-daapd.conf

Useful vi commands:
KeyCommandExample
/Search/mp3_dir
AAppend at end of lineA,/sharedirectory
xDelete character
ddDelete lineUseful if you hit the arrow keys whilst appending
JJoin lines
EscFinish editing
:wqWrite file and quit
:q!Quit without writing file


The mp3_dir key holds a comma separated list of directories to search for audio files, so the offending share may be added as an extra directory:

mp3_dir = /home/media/music,/home/media/music/share

Write the file and quit (using the command :wq), then restart the service:

sudo /etc/init.d/mt-daapd start
Starting mt-daapd: mt-daapd.

Bingo! Where's that cup of tea ?

Building a home entertainment network:
  1. Designing a Network with Linux
  2. Installing Firefly Media Server
  3. Turning a PC into a Wireless Access Point pt I
  4. Turning a PC into a Wireless Access Point pt II
  5. Serving Video on Demand to a Dreambox

Thursday, 9 September 2010

Building a home entertainment network

...on a budget

Since I have a lot of networked devices floating around the house, I think that it would be good to integrate them:
  • LANDisk NAS storage
  • Roku Soundbridge Internet radio
  • Dreambox 500s (Linux) Satellite receiver
  • Old PC in loft
Conceptually, the old PC will act as a server, delivering music content to the Soundbridge and video to the Dreambox. The content will be stored both locally and on the NAS.

Some of the videos will require conversion to MPEG-2 as the Dreambox has a very small processor.

The Soundbridge is connected to the stereo, which is in a different part of the living room to the TV (and with wooden floors, cabling is not an option), so it would be a real bonus if the video content could have its sound delivered separately.

Design

How do you design a network on Linux ? A very short search (via SearchMarked.com ) put me onto OpenOffice.org's Draw application (already installed on Ubuntu), and Mark Lautman's helpful Open Office shapes repository. A bit more googling brought me the Cisco templates (this is where I got the clouds from).

In Draw, choose Extension Manager from the Tools menu to import the Cisco Templates.

Choose Gallery from the Tools menu to see the new objects - the interface is a bit clunky, so I found myself toggling the gallery so that it was only visible when I really needed it.

Resizing the Cisco clouds leads to quite unpredictable results, but perseverance pays off.

Mark Lautman's shapes are a bit easier to use - just open the document and use copy/paste to import the shape into your document.

A few minutes later and an export to JPEG... voila:

The PC in the loft is already running Ubuntu 10.04 and serving weather forecasts to the Soundbridge, so the first stage will be to set up a media server.


Building a home entertainment network:
  1. Designing a Network with Linux
  2. Installing Firefly Media Server
  3. Turning a PC into a Wireless Access Point pt I
  4. Turning a PC into a Wireless Access Point pt II
  5. Serving Video on Demand to a Dreambox